Cluster Basics and Housekeeping
The first activity this morning involves getting logged into and oriented on the cluster and getting programs and resources set up for the actual workshop. We make no assumptions about prior experience with cluster environments, so we scaffold the entire participant workshop experience from first principles. More advanced users hopefully will find value in some of the finer details we present.
- Connecting to the cluster: Windows/Mac/Linux
- Setting up the computing environment
- Writing and executing an example job submission script
- Establishing an interactive session
Tutorial documentation conventions
Each grey cell in this tutorial indicates a command line interaction. Lines starting with $ indicate a command that should be executed in a terminal, for example by copying and pasting the text into your terminal. All lines in code cells beginning with ## are comments and should not be copied and executed. Elements in code cells surrounded by angle brackets (e.g. <username>) are variables that need to be replaced by the user. All other lines should be interpreted as output from the issued commands.
## Example Code Cell.
## Create an empty file in my home directory called `watdo.txt`
$ touch ~/watdo.txt

## Print "wat" to the screen
$ echo "wat"
wat
UiO High Performance Computing System (Abel)
Computational resources for the duration of this workshop have been generously provided by the The Norwegian Research Council (Uninett Sigma2, via the Notur project) and the University of Oslo (Depts. of Astrophysics, Chemistry, Biology, CMBN, CEES and others). The HPC we will be using is located at:
abel.uio.no
CompPhylo Participant Username/Port# List
SSH and the command line
Unlike laptop or desktop computers, cluster systems typically (almost exclusively) do not have graphical user input interfaces. Interacting with an HPC system therefore requires use of the command line to establish a connection, and for running programs and submitting jobs remotely on the cluster. To interact with the cluster through a terminal we use a program called SSH (secure shell) to create a fast and secure connection.
SSH for windows
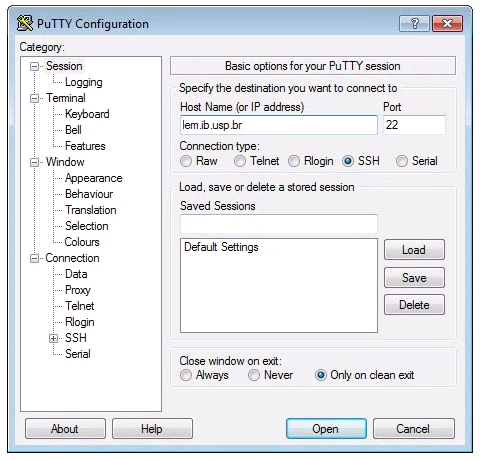
Windows computers need to use a 3rd party app for connecting to remote computers. The best app for this in my experience is puTTY, a free SSH client. Right click and “Save link as” on the 64-bit binary executable link if you are using a PC.
After installing puTTY, open it and you will see a box where you can enter the
“Host Name (or IP Address)” of the computer you want to connect to (the ‘host’).
To connect to the Abel cluster, enter: abel.uio.no. The default “Connection
Type” should be “SSH”, and the default “Port” should be “22”. It’s good to
verify these values. Leave everything else as defualt and click “Open”.
SSH for mac/linux
Linux operating systems come preinstalled with an ssh command line client, which we will assume linux users are aware of how to use. Mac computers are built on top of a linux-like operating system so they too ship with an SSH client, which can be accessed through the Terminal app. In a Finder window open Applications->Utilities->Terminal, then you can start an ssh session like this:
# enter your username here
$ ssh <username>@abel.uio.no

# this is an example for the username iovercast
$ ssh iovercast@abel.uio.no
Note on usage: In command line commands we’ll use the convention of wrapping variable names in angle-brackets. For example, in the command above you should substitute your own username for
<username>. We will provide usernames and passwords on the day of the workshop.
Initializing and activating your conda environment
Conda is a command line software installation tool based on python. It will allow us to install and run various useful applications inside our home directory that we would otherwise have to hassle the HPC admins to install for us. Conda provides an isolated environment for each user, allowing us all to manage our own independent suites of applications, based on our own computing needs.
We have prepared a custom built conda environment for use during this workshop that includes much of the software you’ll need. Doing the install yourself is straightforward, but the process takes some time, so we just provide you the working environment. Directions for actually doing the conda install from scratch are available on the conda install page.
# Switch to my read-only conda install (only need to do this once):
$ /usit/abel/u1/iovercast/miniconda3/bin/conda init

# Refresh your bash instance to see the new configuration. Your
# terminal will now reflect that you have the `(base)` environment
# activated.
$ bash

# Activate the conda env we'll use:
(base) $ conda activate CompPhylo_1

(CompPhylo_1) $ which python
/usit/abel/u1/iovercast/miniconda3/envs/CompPhylo_1/bin/python
The first line here initializes sets your default conda install to be the one
that we have prepared. The next step ‘activates’ the CompPhylo_1 environment,
which is where all the software lives. This will give us a new terminal where
you can ask which python version is preferred.
NB: Conda has a notion of ‘environments’ which are isolated containers for installing suites of programs and their dependencies. You can see when we activate an environment it changes the prompt to indicate which environment is active.
The queueing system and an example Job Submission Script
Abel utilizes a SLURM workload management system for handling job submission, queueing, and resource allocation. In this workshop we will only be scratching the surface of how to interact with it, and all the powerful things you can do. For more information you can see the very detailed job script documentation on the UiO Abel site
The general idea is that we will need to write simple scripts to tell the cluster what we want to run, how we want to run it, and what kinds of resources to allocate. We’ll practice with a simple script here.
We will use the nano text editor to create a new job submission script, like this:
# First make a directory to contain workshop files
$ mkdir compphylo_workshop
$ nano compphylo_workshop/myfirst.job
Nano is a very basic text editor, so you’ll need to use only the arrow keys on the keyboard for navigating around the file. Nano accepts a few special keyboard commands for doing things other than modifying text, and it lists these on the bottom of the frame. Edit the file to contain this text:
#!/bin/bash
#SBATCH --account=nn9458k
#SBATCH --time=00:10:00
#SBATCH --mem-per-cpu=1G

cd ~/compphylo_workshop/
echo "Hello World" > watdo.txt
NB: The
~character is a shortcut which represents your home directory. NB: Theaccount,time, andmem-per-cpuparameters are compulsory, your job will not run if any of them are not specified.
After you finish the script you may save and exit nano by typing CTRL+o (to write Output), and then CTRL+x (to eXit the program).
Note: The
CTRL+xnotation indicates that you should hold down the control key (which is often styled ‘ctrl’ on the keyboard) and then push ‘x’.
Submit this job to the cluster with sbatch and if your job script is well
formed you’ll receive notification that the job was submitted as well as the
job id #:
$ sbatch compphylo_workshop/myfirst.job
Submitted batch job 27708069
And now monitor the progress of the job with `squeue:
$ squeue -u <username>
             JOBID PARTITION     NAME     USER ST       TIME  NODES NODELIST(REASON)
          27708069    normal myfirst. iovercas R        0:02      1 c16-1
squeue shows all the critical information about your running jobs, including the
job status (ST), the job ID #, and the name of the compute node the job is
running on (here c16-1). If the job is pending (PD) the reason for the delay
will show in the NODELIST(REASON) feild. The complete documentation of status codes
and “REASON” codes are provided on the squeue man page.
You’ll know your job is finished because it won’t be in the queue anymore:
$ squeue -u iovercast
             JOBID PARTITION     NAME     USER ST       TIME  NODES NODELIST(REASON)
Also, there will be a new file in your work directory, which you can examine:
$ cat ~/compphylo_workshop/watdo.txt
Hello World
This is essentially how all cluster job submission scripts act, just with (hopefully) more complicated and interesting results.
Establish an interactive session
Finally, it is often handy to get an interactive session on a compute node rather than writing a job submission script, for example if you need to tinker with your computational workflow in the live cluster environment, or maybe you just prefer to operate your own stuff at the command line. In this case you can request an interactive session which will drop you onto the command line on a compute node.
The qlogin command will grant you an interactive session, but it takes
a bunch of arguments that would be annoying to type out every time, so
lets just write a quick script. Use nano to edit a file called
qlogin.sh and type out the following commands:
#!/bin/bash

qlogin --account=nn9458k --ntasks 1 --cpus-per-task 4
Now you can run this script and verify that you ended up on a compute node.
$ bash qlogin.sh
salloc: Pending job allocation 27784665
salloc: job 27784665 queued and waiting for resources
salloc: job 27784665 has been allocated resources
salloc: Granted job allocation 27784665
srun: Job step created
# Use the `hostname` command to verify that you are on a compute node.
$ hostname
compute-15-4.local
BAM!
Interactive mode is really useful for when you’re writing a job
submission script and you need to test it in the live HPC environment.
We will use this throughout the workshop, but for now let us exit
to reliquish this allocation and return back to a terminal on the
head node.